
How Do You Bake Air Dry Clay? Step-by-Step Guide for Best Results
Baking air dry clay might seem counterintuitive since it’s designed to harden without heat, yet applying low heat can enhance its durability when done correctly. If you want to improve the strength and finish of your air dry clay projects, understanding how to bake air dry clay is essential. You’ll need to prepare your piece carefully and control your oven’s temperature precisely to avoid cracking or burning.
By following these steps, you can ensure your clay hardens properly and lasts longer. Understanding these steps can make all the difference in your project’s success—so let’s explore how to bake air dry clay the right way, step by step.
Understanding Air Dry Clay and Baking Risks

Although you might be tempted to speed up the drying process, air dry clay hardens best by simply being exposed to air and losing moisture naturally. Baking air dry clay isn’t recommended because the rapid moisture loss caused by high oven temperature can lead to cracking and warping.
Unlike polymer clay, air dry clay doesn’t need baking to set. Doing so risks damaging its structural integrity. When you bake air dry clay, the heat can weaken the material, making it fragile and more prone to breakage.
To preserve your sculpture’s strength, it’s better to allow the drying process to proceed slowly with proper airflow. Avoid using an oven to dry air dry clay; it compromises your piece rather than improving it.
Preparing Your Sculpture for Baking

Before you bake your air dry clay sculpture, make sure it’s completely dry by feeling for a cool, consistent surface. Slow drying is key; air dry clay takes time to fully dry, so be patient.
Uneven thickness can cause wet spots, so aim for an even thickness throughout your piece. Check for any air bubbles, as these can expand during baking, causing cracks or breaks.
Place your sculpture on a tray lined with aluminum foil to prevent sticking and support fragile parts to avoid warping.
Setting Up Your Oven Safely
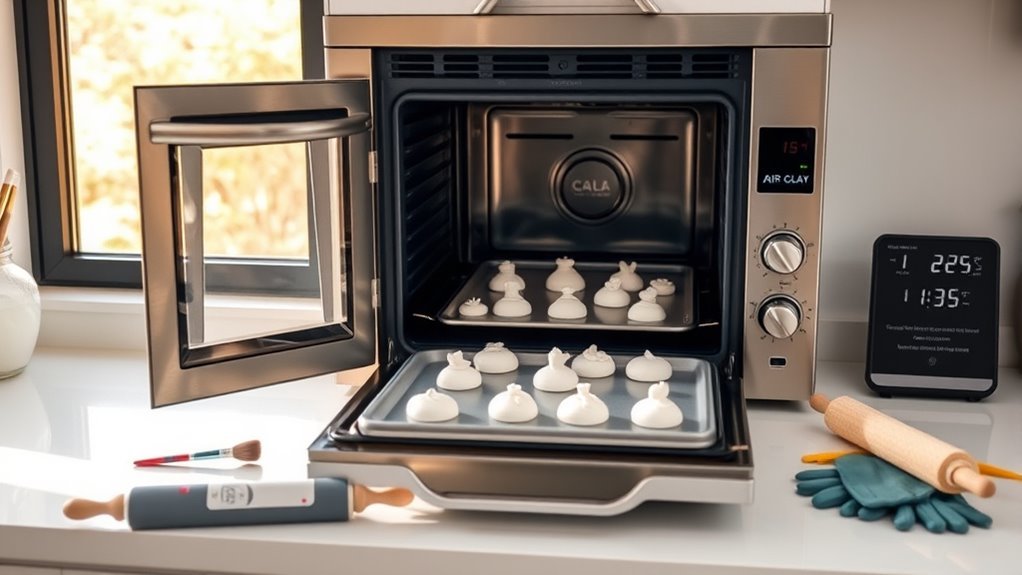
When you’re ready to bake your air dry clay sculpture, make sure you use a conventional oven rather than a toaster or microwave to guarantee even heat distribution.
For proper oven safety, follow these steps:
- Always start with a cold oven. This prevents thermal shock and helps avoid warping or cracking your sculpture.
- Line your baking tray with aluminum foil or parchment paper. This prevents sticking and makes cleanup easier.
- Set and monitor your oven’s temperature carefully, keeping it between 200-250°F (93-121°C). Proper temperature control is key to preventing cracking or burning.
Baking Temperature and Time Guidelines
Since air dry clay is meant to harden naturally, baking it requires careful attention to temperature and time to avoid damage. Keep your baking temperature between 200°F and 250°F to prevent clay cracking, warping, or burning.
Baking air dry clay needs low heat and short times to avoid cracking or warping.
Limit drying time to 15 minutes for small, thin pieces (about 1/4 inch thick) and avoid baking larger sculptures all at once. Use multiple short sessions instead.
Always place your clay on a baking sheet to ensure even heat control and protect your oven. For oven safety, never exceed 30 minutes total baking time.
After baking, turn off the oven and let your piece cool gradually inside. This cooling process reduces stress on the clay and completes drying without causing cracks.
Following these guidelines helps maintain your clay’s integrity throughout baking.
Monitoring and Adjusting During Baking
Although air dry clay hardens naturally, you’ll need to monitor your oven carefully during baking to keep the temperature steady between 200°F and 250°F. Use an oven thermometer to track the temperature and prevent overheating.
Watch for signs of warping or cracking and make baking adjustments based on what you see. Here’s how to stay on top of the process:
- Check the temperature regularly with your oven thermometer to maintain a stable baking environment.
- Monitor drying time closely; larger or thicker pieces may need longer or multiple baking sessions.
- Pause baking if you notice warping or cracking, reposition or adjust thickness, then continue baking.
These steps ensure even drying and reduce damage during baking, helping your sculpture harden perfectly without issues.
Cooling Down Your Sculpture Properly
To prevent cracking and warping, you should let your baked sculpture cool gradually inside the oven with the door slightly open for at least 30 minutes. This slow cooling avoids thermal shock from sudden temperature changes.
Afterward, place your sculpture on a wire rack to ensure even temperature reduction and prevent moisture buildup. Don’t remove it immediately; let it reach room temperature undisturbed.
Handle only when cool to avoid cracking or deforming.
| Cooling Step | Why It Matters |
|---|---|
| Cool in oven (door ajar) | Prevents thermal shock & cracks |
| Use wire rack | Ensures even cooling & airflow |
| Wait till room temp | Avoids warping & surface damage |
Post-Baking Care and Finishing Touches
Once your air dry clay sculpture has cooled completely, you’ll want to handle it carefully to avoid any warping or cracking. Proper post-baking care guarantees your piece stays beautiful and durable.
- Start by gently sanding any rough edges or surface imperfections with fine-grit sandpaper to achieve a smooth, professional finish.
- Next, apply a suitable sealant or acrylic varnish to protect the sculpture from moisture and wear. This step enhances durability and adds a polished look.
- Finally, store your finished sculpture in a dry, dust-free environment to preserve its appearance and prevent damage over time. Following these finishing touches after cooling will keep your air dry clay art looking great for years to come.
Frequently Asked Questions
How to Bake Air Dry Clay in the Oven?
You start with a cold oven set between 200-250°F, place your clay on a foil-lined tray, and bake small pieces for 15 minutes. Then turn off the oven and let your sculpture cool inside gradually to prevent cracking.
How to Use Air Dry Clay for Beginners Step by Step?
Start by kneading the clay until soft and smooth. Shape your project evenly, then let it air dry for 1-3 days in a ventilated spot.
Finally, seal it with paint or varnish for durability.
How Long Do You Need to Let Air Dry Clay Dry?
Like waiting for a seed to bloom, you’ll need 24 to 72 hours for air dry clay to fully dry. Thicker pieces may take longer, up to a week in humid conditions, so be patient and gentle with it.
How to Dry Air Dry Clay Without Cracking in the Oven?
You won’t want to rush drying air dry clay in the oven. Use a low temperature (200-250°F), bake in short intervals, and let the piece cool gradually inside to prevent cracking and warping.
Conclusion
Baking air dry clay is like guiding a delicate seedling through a gentle sunrise—slow, steady warmth nurtures it to strength without harm. By preparing your sculpture carefully, controlling the oven’s low heat, and allowing it to cool gradually, you’ll bring your creation to life without cracking or damage.
With patience and care, you’ll transform fragile clay into a lasting masterpiece, ready to proudly display your artistic journey. Remember, mastering how you bake air dry clay step by step ensures your artwork remains beautiful and durable for years to come. Following these steps will help you achieve perfect results every time.